
The material on this page is for Administrators. Other users do not have access to the tools used in setting up a new DVHH website.
Initial Setup
All site have to be set up initially by the DVHH webmaster. The administrator assigned to the site will receive an email with a link to set up a password.
Follow that link and set up your password (normally your WordPress password). Then do the initial login. You will be taken to the dashboard in a flowery-named site. Close the browser.
Start up your browser again and log in to the newly created site using the new DVHH website URL. The dashboard for the site will open.
The default theme will have been installed along with other themes and some plugins.
Before installing the Astra theme that is our DVHH standard theme, there are some steps to take first:
Upload the logo that has been created for this new site and the poppy icon.
Create two pages, Home and News. Leave them blank but publish them.
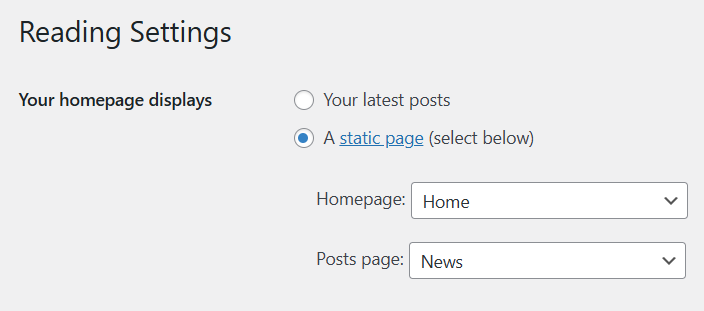
Go to Setting > Reading and set. Set Your homepage display to A static page. In the boxes set Homepage to Home and Posts page to News.
The reason for adding images to Media and setting up the two pages and the Settings is this: When the Astra theme is installed on a totally blank, new site it adds a variety of images and initial pages and settings. When there are already some pages and media it will install without that fuss.
Install Astra theme
Install the Astra them. Go to Appearance > Theme. Click Add Theme – On the themes page type astra into the Search Themes box. The Astra them will be show. Click Install and then Activate. Then delete the other themes that have been installed.
Set Site Identity
In Appearance > Customize > Site Identity set the site icon and the site logo.
Do not allow cropping when selecting the icon or the logo.
Plugins
Go to Plugins and click Add Plugin. In the Search Plugins box type code snippets. The Code Snippets plugin will be show at the top. Click Install Now. Then click Activate.
Delete all other plugins that have been installed except LightSpeed Cache.
Code Snippets
In the dashboard click Snippets. A number of snippets will have been installed but not turned on. Delete them all.
Last updated date
Next create a snippet to insert the last updated date on each page that will be created on this site:
Click Add New.
Use this title: Auto Add Last Updated Date to Pages
Then copy this code and enter it:
function add_last_updated_to_pages($content) {
    if (is_singular('page') && in_the_loop() && is_main_query()) {
        $updated = get_the_modified_time('m/d/Y');
        $updated_html = '<br><br><p style="text-align:center; font-style:italic;">Last updated: ' . esc_html($updated) . '</p>';
        return $content . $updated_html;
    }
    return $content;
}

add_filter('the_content', 'add_last_updated_to_pages');
Click Save and Activate.
Back – Next Page Navigation
Next add the previous page – next page navigation links code for potential use. This will have to be updated later when such use is implemented on a group of pages.
Click Add New.
Use this temporary title: B-N Page Navigation.
Copy and insert this code:
function b-n_navigation_links() {
global $post;
$siblings = get_pages(array(
'child_of' => $post->post_parent,
'sort_column' => 'post_title',
'sort_order' => 'ASC',
));
$current_index = array_search($post, $siblings);
$prev_link = $next_link = '';
if ($current_index !== false) {
if (isset($siblings[$current_index - 1])) {
$prev_link = '<a href="' . get_permalink($siblings[$current_index - 1]->ID) . '">« Previous: ' . $siblings[$current_index - 1]->post_title . '</a>';
}
if (isset($siblings[$current_index + 1])) {
$next_link = '<a href="' . get_permalink($siblings[$current_index + 1]->ID) . '">Next: ' . $siblings[$current_index + 1]->post_title . ' »</a>';
}
}
return '<div class="tour-nav" style="margin-top:.2em; font-size:LARGE; font-weight:bold; text-align:center;">' . $prev_link . ' ' . $next_link . '</div>';
}
add_shortcode('tour_nav', 'b-n_navigation_links');Click Save – Do not activate at this time.
Click Add New.
Use this temporary title: Auto-insert Navigation on B-N Pages.
Then copy and insert this code:
function auto_insert_b-n_nav($content) {
    if (is_page() && in_the_loop() && is_main_query()) {
        global $post;

        $tour_parent_id = 243; // place holder for parent page id of group of pages with previous - next nav

        if ($post->post_parent == $tour_parent_id) {
            $nav = do_shortcode('[b-n_nav]');
 		$content = $nav . $content; // prepend to top
		$content .= $nav; // Append to bottom
        }
    }
    return $content;
}
add_filter('the_content', 'auto_insert_b-n_nav');
Click Save. Do not activate at this time.
Custom Menu
On some pages custom menus might be needed. Create a snippet to support that:
Click Add New.
Use this title: Custom Menu.
Then copy and insert this code:
// Shortcode to display a custom menu by name
function custom_menu( $atts ) {
    $atts = shortcode_atts(
        array(
            'name' => '', // the menu name (as set in Appearance → Menus)
        ),
        $atts,
        'menu'
    );

    if ( empty( $atts['name'] ) ) {
        return ''; // nothing if no name is given
    }

    return wp_nav_menu( array(
        'menu'            => $atts['name'],
        'container'       => 'nav',
        'container_class' => 'shortcode-menu-container',
        'menu_class'      => 'shortcode-menu',
        'echo'            => false,
    ));
}
add_shortcode( 'show_custom_menu', 'custom_menu' );
Click Save and Activate.
This will allow adding a custom menu on any page, any location. The styling will be controlled by custom CSS code.
In the dashboard click Appearance > Customize > Additional CSS.
Then copy and insert this code:
/* Special custom menu (shortcode only) */
.shortcode-menu-container {
    text-align: center;       /* center the whole menu */
    margin: 1.5em 0;
}

.shortcode-menu {
    list-style: none;         /* no bullets */
    margin: 0;
    padding: 0;
    display: inline-flex;     /* items in one line */
    gap: 2rem;                /* space between items */
    font-size: 1.5rem;          /* XL font size (~24px) */
    font-weight: bold;        /* bold text */
}

.shortcode-menu li {
    margin: 0;
    padding: 0;
}

.shortcode-menu a {
    text-decoration: none;
    color: inherit;           /* use current theme text color */
    transition: color 0.2s ease;
}

.shortcode-menu a:hover {
    color: #0073e6;           /* hover color (adjust if desired) */
}
The styling code will be saved when you return to the dashboard.
That is all for the initial website setup. Now allow the Editor to copy over the information from the old DVHH website.
When the pages are set up and the navigation needs to be added proceed as follows:
—– details will be added later.